
AtlasImage
AtlasImage is a component that use SpriteAtlas for UI.
In addition, add useful sprite selector and border editor to the inspector.


<< Description | Demo | Download | Usage | Development Note | Change log >>
Description
Are you still fatigued with SpriteAtlas and Image?
AtlasImage provides useful feature to use SpriteAtlas for UI.
Sprite for renderring can be changed using a SpriteAtlas and a sprite name.
atlasImage.spriteAtlas = Resources.Load("A SpriteAtlas name") as SpriteAtlas;
atlasImage.spriteName = "A sprite name in the SpriteAtlas";
In the inspector, sprite selection window shows only sprites in SpriteAtlas.
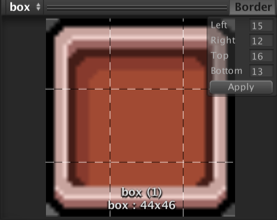
You can edit the border in the preview window.
Demo
Usage
- Download
AtlasImage.unitypackagefrom Releases. - Import the package into your Unity project. Go to
Assets > Import Package > Custom Packageand selectAtlasImage.unitypackage. - Enable SpriteAtlas. Go to
Edit > Project Settings > Editor, and change the sprite packing mode from Disabled to either:- Enabled for Builds, when you want to use packing for builds only and not when in Play mode.
- Always Enabled when you want the packed Sprite to resolve its texture from the Sprite Atlas during Play mode, but resolve its texture from the original Texture during Edit mode.
- Add
AtlasImagecomponent instead ofImagecomponent fromAdd Componentin inspector. - Select the SpriteAtlas by dropdown manu, and select the Sprite by ObjectSelectorWindow.
- Enjoy!
Requirement
- Unity 2017.1+
- No other SDK are required
Development Note
License
Author
See Also
- GitHub page : https://github.com/mob-sakai/AtlasImage
- Releases : https://github.com/mob-sakai/AtlasImage/releases
- Issue tracker : https://github.com/mob-sakai/AtlasImage/issues
- Current project : https://github.com/mob-sakai/AtlasImage/projects/1
- Change log : https://github.com/mob-sakai/AtlasImage/blob/master/CHANGELOG.md